Showing posts with label Beauty


Hello Everyone! I hope you all had a beautiful weekend. I especially hope that today you all take a few moments to reflect on the life and work of Dr. King .  I have several people whom I consider heroes. Dr. King is at the top of that list.

So, I have had people ask me from time to time why I hardly ever put makeup tutorials on here. The short answer to that is because I'm wholly unqualified to do so.  I'm not a cosmologist, beautician, licensed makeup artist. I feel I can give you guys fair makeup reviews because of how much I purchase and use. Still, that doesn't mean I'm the one to tell you how do the perfect cat eye, ect.

Nowadays, you can turn to YouTube to find pretty much any tutorial that you want. However, over the last couple of years, the YouTube beauty community has become a dumpster fire, in my opinion. (Read-messy and out of control).
I flat out refuse to so much as click on the video of an "influencer" who spews racist nastiness on their twitter. Nor, will I click on an "influencer" who mocks autistic children on his channel.

Then, there are the people who don't do anything as egregious as that stuff, but each and every video is nothing but a sales pitch where we are all supposed to click/shop their affiliate links. Sorry, but if  I wanted to watch info-mercials I'd set my DV-R to record from 1:00-5:00 am.

Thankfully, there are still a few folks on You-Tube who are consummate professionals that vibrate above the drama and non-sense.  Today, I want to introduce you to them.


First and foremost is Wayne Goss     Wayne Goss Youtube


Dare I say it? This man is the Kevin Aucoin of this generation. His work is beyond amazing. His personality is sweet and genuinely warm. Each of his videos tends to run between 5-7 minutes. There are never any rambling intros. He's sweet and to the point.
If I could have my makeup done by any living person, it would be him. 


Next up, is Zabrena    Zabrena's YouTube


Zebrena might not be a licensed MUA, but her skills rival anyone . Her tutorials are detailed and super easy to follow along with. When watching her channel, you feel as if you are chatting with a very good friend.
She also is famous for finding drug store dupes for high end products. she has an entire series that she calls "Frugal Fridays". Every product she uses in this series is from the drug store.


On to Makeup by Lisa J Makeup by Lisa J YouTube


Before becoming a mom, Lisa J's job was as a MAC trainer. Meaning, she was the one who trained MAC makeup artists. 
Her genuine love of the "magic of makeup" shines through in every video.  Her ability to make makeup look so professional and put together is astounding.


Last , but not least is Dominique Saches     Dominique Sachse YouTube


When I think of Dominique, the first adjective which comes to mind is elegant. This lady has class for days.
While her channel is not specifically a beauty channel, beauty is a huge part of her channel. Dominique is a news anchor in Texas. Because of this, she has a wealth of beauty knowledge that she openly shares. She comes across as the big sister who wants, no insists on the absolute best for you.


So, there you go. These folks are the four YouTubers that I turn to for inspiration and how-to's.
Is there anyone on that platform that you love who also consistently stays above the B.S.?
If so, tell me about them!


Have a beautiful week my friends!
XO
S 


Hi there, I hope you are having a great week and and awesome start to 2019.

One thing I've been seeing a lot of lately is various article discussing how long its safe to keep your makeup . It can get confusing. Especially because there is a lot of conflicting information out there.

Today, I'm here to teach you a little trick.  Virtually every cosmetic/ personal care product tells you how long its good for once its opened.
Once you know what you are looking for, its easy to spot. The symbol is the same on all products.
Often, its right on the bottle. Sometimes, its on the box.


This MAC Strobe cream is good for 2 years once it has been opened.


This concealer is good for 12 months or one year after its been opened.


Same goes for this highlighter. Its good for one year after being opened.


This shampoo will be good to use for two years once its been opened.


So, if you are wondering if something is safe to use, look for the open container symbol aka the PAO symbol.


Now, do I toss everything and anything once it hits this mark? No, not by a long shot. If I have a setting powder which I use very sparingly, #over30makeup there is no way that it will be used up in a year.
However, for anything that goes near the eye, particular if its liquid,  i,e mascara, concealer ...it gets tossed after 6 months.
Also, while lipstick can hold its own, lip gloss starts to break down after 6-8 months, in my experience.

Keep in mind, if you have sensitive skin, you might have to toss somethings before you get to that date. If this happens, try buying travel sized versions of your favorites next time. They might cost more per ounce, but this way you are not throwing your money away.

Well, that wraps up today's "lesson". I hope this was helpful! 

XO
~S


Hello my friends!
"Now, the calendar is just one page, and of course I am excited."
Boy, this year has flown and now we are in the throws of the Christmas/ Hanukkah season.
I'm a big believer in the "Done by December 1" philosophy for Christmas shopping. 
I love shopping for everyone else. Its a great feeling to give someone something that you know they either really wanted or could really use.

The trouble for me is when the tables are turned. When someone says "Sheila, what would you like for Christmas?" I shrug and say "Um...I dunno".

I think this is true for a lot of people. I put my thinking cap on and thought back to things that I have asked for in the past (or am asking for this year) that have served me well. Hopefully, this might help you out! Don't think there is some type of glory in telling people "Don't get me anything!"If someone wants to buy you a gift, don't be a jerk and make it unnecessarily hard on them by making them try to guess as to what to get you.

Below are my suggestions. Like I said I have either asked for these things in recent years or are asking for them this year. Also, if you have any suggestions, please do share! I'm all ears!!

With no further ado.......


  1.  A vineyard Vines Shep Shirt
  2. A pair of LL Bean Duck shoes or boots
  3. A Tory Burch Tote


  1. A designer key fob
  2. Ugg Slippers ( Now available in Faux fur as well as the traditional genuine shearing)
  3.  A cozy winter beanie


  1. A full set of quality cosmetic brushes
  2. A designer belt
  3. Hunter rain boots


  1. A Starbucks gift card
  2. Classic gold hoop earrings
  3. A luxury hair mask


  1. A new perfume
  2. A Clarisonic facial brush
  3. A JCrew vest
Okay, That;s it for me today. I hope this post gets your wheels turning and helps you think of somethings that you'd like to get this year.
Like I said, don't play the martyr and refuse to give folks suggestions of what you'd like. I know I feel so much better when I know that I am getting someone something I'm certain they want. Its SO much better than trying to wing it and hope you get something they'd like!!

Most importantly though, be sure to take the time to relax and reflect this season. This is a time of love and joy. Don't cause yourself (or anyone else) unnecessary stress.
when all is said and done, what makes Christmas so wonderful is not the giving or the getting. Its the loving.


XO
~S


All about dipped nails

November 02, 2018 in

Hello friends!
Sorry it's been a hot minute. We had a scare with one of dogs, my precious Bandit. He had a lump that had to be removed and we were waiting for the pathology to come back...it was a LONG 11 days. Thank God, hes going to be just fine!

Anyhow, I thought today would be a good time to talk about "Dipped" nails. Its a topic that I get asked about frequently.

Flash back to November of 2010. My husband( boyfriend at the time) was in Kansas City for work, so I came out to spend Thanksgiving with him.  The Friday after Thanksgiving, he had to work a 1/2 day, so I had some time to spend...of course, I found the nail salon. It was the first time I tried a gel (they called it shellac at the time). I loved it, and thought it was great. Gel manis became my go to. 

The years past, and the bloom came off the rose so to speak. I'd noticed how if my hands were in water for a period of time , the gel polish would start to "lift". I'd notice how if the nail tech applied the gel too thick, it would come right off. Also, I was never crazy about having to place my hands under the UV light for the polish to "cure". No thanks to skin cancer and premature aging.
Enter in the dipped manicure. Its a long (longer than dipped) lasting manicure with no harmful UV rays.Personally, I've been doing nothing but dipped manicures since October of 2017. People are intrigued by this and I get more than a few questions. I figured it would be helpful to address the questions that I most commonly get , point by point. For this info, I consulted with my a certified, licensed in the commonwealth nail technician.

  • Dipped nails are NOT acrylic nails.                       

This is a rumor I have seen for awhile now. People see the powder and think back to the days of acrylic powder being applied with a brush  to overlay a nail tip.
With dipped nails, your nail is dipped directly into a colored powder. You certainly could apply a tip to your nail for added length with dipped nails. However, unlike acrylic nails, there is no drilling involved. 

  • Your dipped mani will last 3+ weeks if you choose

Much unlike traditional manicures, gel manicures and acrylics, you will not need to be at the salon every two weeks on the dot (unless you choose to!). I currently have a dark brown dipped manicure which is 4  weeks old. I'm going to the salon later today because I'm tired of this color and have some new growth. However, my mani is unchiped, unfaded and still shinny.

  • If you want to grow your nails long, this is how to do it

Dipped nails make your nails as close to unbreakable as can be. Even those of us who have the thinnest, weakest nails, will have super strong nails. If you look at the bottom right photo above, you'll see how long my nails are. Without dipped nails, this would of NEVER happened. My nails would grow a tiny  bit, then break. With a dipped manicure, your nails are fortified and protected from all of the external factors which can weaken them.

  • There is no drying time/ No UV lights involved


Your nails are never "wet". Therefore, there is nothing that can smudge or smear. There are no harmful UV lamps involved. "Nuff said!"

  • Unlike gel manicures dipped manicures will not weaken your nails even when the polish is off.

I'm sure someone, somewhere will argue with me on this point. However, I stand by it fully.
After our last vacation, I just could not get in to get a mani. I was far too busy playing catch up. So,I went a good 3 weeks with 'naked nails'. I noticed how strong my nails felt. They were smooth, and oh so healthy. I asked the nail professional who helped me with this post and she concurred. "There is nothing about the dipping process when done correctly which compromise the nail or the nail bed."

  • Removal of dipped "polish" is a breeze.


No drills, no scraping. Your nail tech will wrap your nails in an acetone remover. After several minutes, it will literally wipe off. It's that easy!


I cannot speak to what salons in other areas charge. Where I live and the salon that I go to , a dipped mani is $3.00 more than a gel manicure. To me, its beyond worth it.
I know that we are all different and have different preferences. If you have been curious about dipped nails, I'd encourage you to try it, at least once.

If you have any questions that I did not cover in this post , feel free to message me!


Shimmer on!


XO
~S


Happy Friday friends! Happy rainy Friday if you are here in New England.

So, Monday is October first #howdidthathappen . I know that I'm supposed to #lovefall. Its what Instagram tells me. I'm supposed to love cool nights, hoodies and camp fires. Well, I guess I failed. I don't love any of that. What I DO love is summer. I love 5:00 am sun rises, 90 degree days and the scent of Coconut sunscreen. However, summer is over for this year. Whining will not change that. In regards to my beauty routine, there ARE some things that I truly look forward to. So, for the sake of staying in a positive mindset, let's live there for a tad!


1) Good hair weather
The humidity is mostly gone at this point. That means that the frizz is gone as well. It's so much easier to style/blow out hair now. 


2) Dark Mani/Pedi's


All spring and summer long, I do light nudes on my hands and brights such as coral and fuchsia on my toes.
Once the air gets its chill, I take that as my cue to switch over to shades such as OPI's "Lincoln Park After Dark." I don't know why, but I've always gravitated toward these shades.


3) No more time or money spent on sunless tanning
I've made no secret about the fact that I am a sunless tan devotee. Starting in late March, I sunless tan 2-3 per week for the entire season. (To read more about that, click Here/ Here ). Like I have said before though, if you ARE going to sunless tan, its a time investment. Each time I do it, its a 20-30 minute process. I'm happy to be free of that for now.


4) No more worrying about makeup sweating or smearing off. 
Its inevitable , when the mercury hits 90+ ( or lower) you'll sweat. For sure some cosmetics do a better job of standing up to the summer weather than others (A post for next spring perhaps??) . Regardless though, June- September I find myself having my makeup being a causality to the summer heat. I'm happy to not deal with any of that for a few months.


That's it for today. I hope everyone has a phenomenal October. 
What are you looking forward too this fall?
I'd love to know!


XO
~S 


Hello!
I hope everyone had a fantastic long, Labor day weekend. Here in Plymouth, the weather was picture perfect.
I know that everyone just loves fall. I do too, but for me, summer is and will always be my number one!
Anyway, last week, my friend Diane and I went out for a nice dinner. (If you are ever in Plymouth, MA be sure to go to Martini's on Main Street. SUCH AMAZING FOOD). We snapped a picture, and I uploaded it to my Instagram (SheShe830).  Well, color me flattered, because I had 7 people ask "How did you do that under your eyes?' Or "What Highlighter is that?"
so, I figured, I might pop on here and give you the info.
Everything that i have on my face, is in this picture here....

As you can see, there was actually no highlighter used. How I did the light under my eyes is through a process called "Baking". Baking is a technique that goes back to the olden days. It was once just considered for use as "stage makeup". However, it has become mainstream recently.  Baking is a way to conceal any dark circles you may have. It is a SUPER powerful way to do this. (The old analogy of bring a gun to a knife fight comes to mind).
It will keep your concealer from fading or cracking. Also, if you tend to get oily, this is your best way of fighting that.
There are are few things to keep in mind.

  • If you want to do this, it is a full makeup look. You'll also need to do foundation, contour and blush in the bare minimum.
  • You absolutely have to do a gradient fade with the concealer as you get further away from your eyes. Otherwise, it will end up looking as if you are wearing a Zorro mask, that is just not a good look.
  • You have to set aside at least 25 minutes for this.          
There are countless YouTube tutorials by actual makeup artists who can give you a step by step on how to do this properly.

In a nutshell though, this is what you do...

  1. Apply your foundation
  2. With a concealer lighter than your skin, "Highlight" anything your want ( In the photo , I did under my eyes, down my nose and the space on my forehead right above my nose.)
  3. With a wet beauty blended, cover the concealer in the thickest coat of loose powder. Literally, you want to be caking this powder on.
  4. Let it rest, untouched for 20-25 minutes ( I did my eye shadow/lashes at this point).
  5. After 20-25 minutes, use an extra large, clean powder brush to dust the powder off of your face.
That's it! Once you've done that, your concealer is literally baked on.

If anyone else gives this a try, send me a pic or tag me, I'd love to see!
.


Hello there. Can you believe we are now in the final three days of August? I cant. 😞
I know my husband will be happy when the hot weather is gone, not me though.
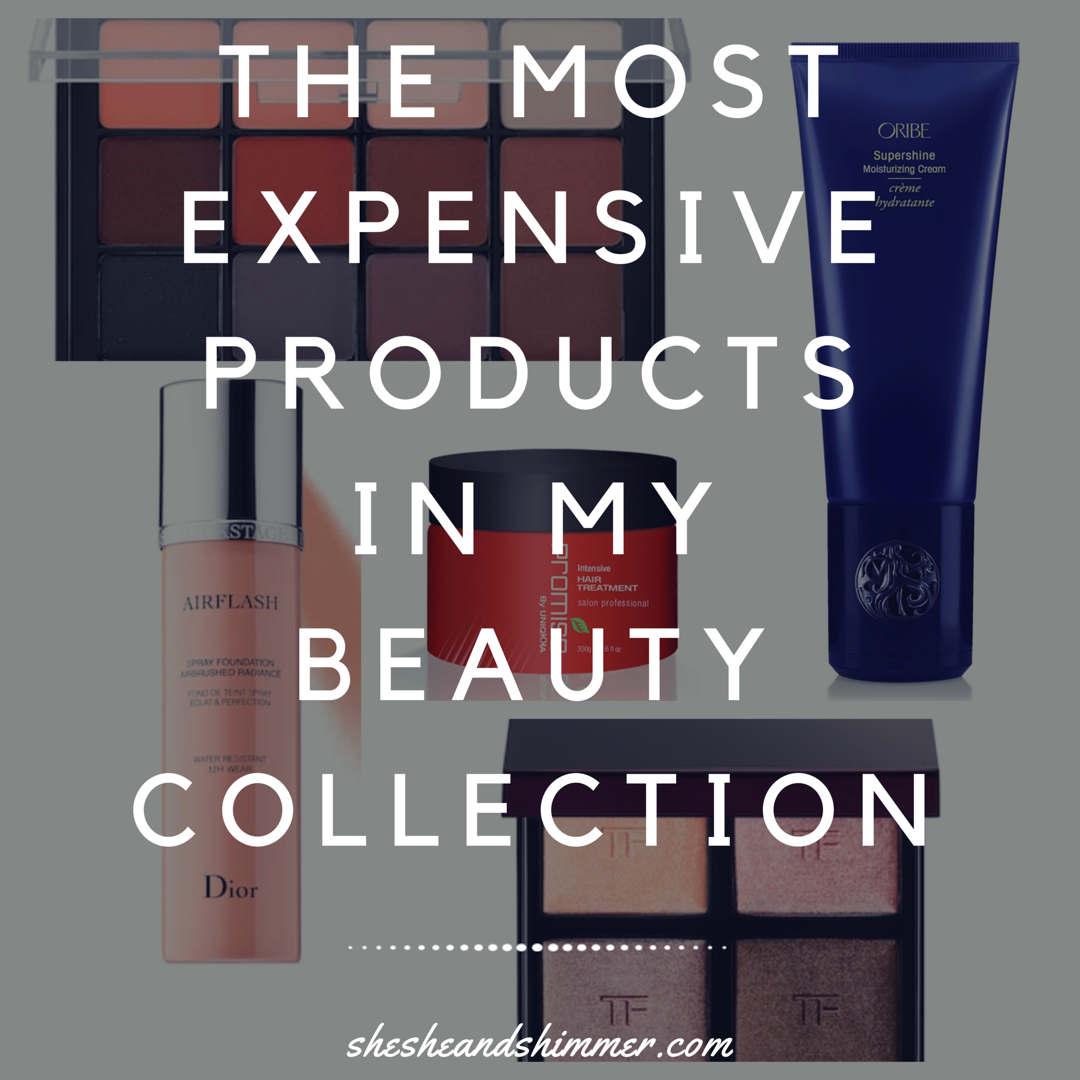
Anyhow, last month I did a post which showed the 5 least expensive beauty products that I use on a regular basis. In the time since then, I've had 5 or 6 people ask "Well, what are the most expensive things in your collection?" At first, I didn't want to do this post. I didn't want it to come across as "Look at my luxury items, aren't you envious?"  However, after sleeping on it, I can see the value in doing this post. Some of these things really are worth their cost. If you have that assurance from a friend before you buy something that costs a pretty penny, you might feel more confident in making the purchase.
However, not all the glitters is gold. there are a couple of things on here that were absolutely NOT worth it. If I can save you from wasting your money like I did, then its worth it.
In fact, lets get the duds out of the way. We'll start with them.


                         Promise Intensive Hair Treatment by Uniqkka      $85.00
                                       Promise Intensive Treatment by Uniqkka
The best thing I can say about this deep conditioning mask is "meh". It's certainly not bad in any way. It does condition your hair. However, it in no way preforms so well as to justify the price.
Kerastase's deep conditioner is considered the gold standard by many stylists. It cost $20.00 less than this.
My personal #producthero deep conditioner is by Moroccan Oil. It costs $45 dollars LESS  and blows this one out of the water.


                                             Tom Ford Eye Quad in "Nude Dip"   $88.00
                                                            Tom Ford Eye Quad
I gave this one away, donated it to a women's shelter. I do question if I just bought the "wrong" quad. All of the other ones are so highly rated on Sephora's website. I truly found this one to be no better than say the Wet and Wild Egg shell palette which costs $2.99.  As in $84.99 less than this.


                                                 Dior Air Flash Foundation   $62.00
                                                     Dior Air Flash Foundation
I'll never, ever be without this stuff. This foundation is the tool for regular folks like us to achieve that perfect, airbrushed look that we always see on the Hollywood folks.
With this, you can have a sheer or as full coverage look. You decide the coverage level you'll have by how much you spray on. Unlike other foundations, it doesn't appear as if you've put several layers of it on.


                                        Orbie Super Shine  Moisturizing Cream   $52.00
                                              Orbie Super Shine Moisturizing Cream
This stuff is the secret to salon perfection blowouts. I have a LOT of hair. A ridiculous amount of hair. My hair takes a very long time to dry and is prone to frizz. I do my fair share of heat styling as well. This stuff is a remedy to all of it. The scent is down right intoxicating. If I could buy it as a perfume, I would. Even though this costs $52.00, you only need the tiniest amount each time. I'm talking a dollop the size of a dime. One tube lasts me 4-5 months.


                                                    Viseart Neutral Matte Palette   $80.00
                                                     Viseart Neutral Matte Palette
If I could only have one item in my beauty collect from now on into forever, this is what I'd choose.
This is literally everything I'd hope for an eye shadow palette. The colors last all day. Every shade in this palette is of the highest quality. Its SO blend-able. You could have 0 makeup application skills and still knock it out of the park if this is what you were working with.
The funny thing is...I almost never bought this. My hubby and I were on vacation. We'd had a wine filled dinner and I was tipsy. We had gone back to the hotel (We walked! Drunk drivers SUCK).
Anyhow, I stopped in at the apothecary-esq store to buy a bath bomb. Of course, makeup is the shiny object that I cant NOT look at. I saw this palette and said "Charge it to my room!" (Sorry, Honey!) 😙
In a few weeks...we'll be back there...I might just recreate that moment with one of their other palettes!


So, there you have it. What are your splurge products that are absolutely worth it?


~XO
SheShe


Hello! Happy Friday! If I've said it once, I've said it a million times... "What's better the a summer Friday!?"

So, last night I got to thinking about the products that I use on a regular basis. My "product heroes" as I often refer to them. Admittedly, I have a penchant for liking higher end products when it comes to cosmetics/beauty. However, a few of the items that I rely most heavily on, are down right cheap.
I thought it might be interesting to list those out with the reasons as to why I love them. As always, I'll include links (at the bottom) and double as always... I make nothing off of you or your clicks. I'm not looking to profit off my friends!


Clinique's  Extra Mild Liquid Facial Soap   $17.50


When you see a youtuber or blogger going on an on about how you "JUST HAVE TO BUY THIS $80.00 FACIAL WASH THAT THEY USE!!" , run! Also, you can be sure they are just trying to get your $$. Regardless of what they tell you, no facial cleanser is going to fight wrinkles,  sun spots, fine lines, etc, etc. A facial cleanser is simply not on your skin long enough to do any such thing. Talk to any dermatologist, they will tell you to get a cleanser that is gentle and non irritating, and to invest the
bulk of your skin care money into serums and creams.  
Personally, I've been using this cleanser since I was 14. I stared with it in bar form and moved into the liquid form when I stared using a Clarisonic brush.

Plus White 5 Minute Whitening Gel  $5.99


Where do I even begin with this one??  First, this stuff works better than any "White strips". Like...WAY better.
This stuff , dare I say...has made my teeth more white than the professional whitening in the dentists office EVER has. 
White Strips will run you around $50.00. In office whitening procedures at the dentist are typically between $200-$500. This tube of $6.00 gel does are more effective job, hands down. You can put it onto a tooth brush and brush it right onto your teeth. I opted to buy inexpensive, customizable trays on Amazon.
When I first started using this, I'd do it 4X a week for 20 minutes at a time ( I drink coffee and red wine!).
Now, my teeth are about as I want them. Therefore, I'll use this once or twice a week for 5 minutes, just for maintaining my teeth's color.


Maybelline Fit Me Loose Powder  $6.00

Those of you who follow me on Instagram  (@sheshe830) recently saw me talk about this. This little ditty has blown me AWAY. I've compared this to my KatVonD, Tarte and Laura Mercier powders...I love them all, but I'd pick this one over any of them. This sets your make up perfectly, yet does not look like you have powder on. If you had covered the label, I'd of guessed that this was a Chanel product.

Target Eye Make Up Remover $2.50
If you wear any eye make up, go get this. The bottle says that it compares to Neutrogena Eye Makeup  remover.... As "Dwight" from "The Office" would say.... FALSE!
The Neutrogena eye makeup remover cannot hold a candle to this.  However, I find it to be a spot on dupe for Lancome's Bi-Facil eye make remover. That stiff costs $28.00 and is worth it. If you can find an eye make up remover that can cut through waterproof mascara, gel liner and still be gentle enough to NOT hurt your eyes, its worth it. When you can find one that does all of that for under $3.00, you know you've scored big time! 

L'Oreal Lash Paradise Mascara     $5.99


I've already talked about this baby in depth in my "Duping Divas"  ( you can read that here....Duping Divas )
Without repeating myself, I'll say this...If I could only own one mascara, it would be this. This out preforms all of the others that I've ever used. The only thing I'd recommend though , is to be sure to buy the WATERPROOF version. For whatever reason, I find the formula of the not waterproof version to be just meh, where the water proof one is a rock star!


Links:


Well that's it for now. If anyone out there knows of any other inexpensive beauty finds, PLEASE comment on this post with them! We could ALL help each other out!

Have a lovely weekend!!


XO
~S


Hello! Happy Thursday my friends!
Thank you to my beautiful , intelligent and all around lovely friend, Glenda for suggesting this post.

Cleaning your make up brushes is something that you hear everyone harp about. We've all heard how you are setting yourself up for horrid  infections, etc if you are using brushes that are not clean. I do think this is somewhat of a scare tactic. If it's just you who uses your brushes and you have not come in contact with any bacterial or viral infections, they probably wont make you sick.
However, this is NOT to say that you get a pass to not clean your brushes. Unclean brushes will give you a mucky, muddy application and likely acne... aint  nobody got time for that! :)

Cleaning your brushes and sponges does not, nor should not be an expensive or time consuming endeavor. First things first... DO NOT WASTE YOUR MONEY ON PRICEY  CLEANING SOLUTIONS that are marked as "brush cleaners"! I've seen this stuff being sold for over $50. That's a scam, plain and simple. Get yourself some original Blue Dawn dish soap. This is the what they use on animals that have been affected by oil spills. It's strong enough to get the oil off, but gentle enough that it won't harm an innocent animal.
The only thing I'd suggest purchasing, is this brush cleaning palette by Real Techniques. It is so easy to use, it fits in the back of your hand. The pivots and grooves truly help to get all of the product out of your brushes. It only costs between $12-15. Its worth every cent in my opinion.  Click here to purchase  ---> Real Techniques Brush Cleaning Palette  Just to reiterate... Nope, I do not make a cent off of you from these links!  #notanincomegengeratingblog .  Once you have everything ready to go, fill up your sink with warm water and a few squirts of Dawn. Add your brushes into the warm soapy water and let them soak for 5-10 minutes.
Don't be alarmed , the water will turn brown. Better that this is in your sink and not being rubbed onto your face.
For each brush, add an additional drop of soap or two to the cleaning palette. Then rub the brush all over the palette.

Once you have done this for each brush, be sure to rinse each one individually and thoroughly under running water.         
If it's a brush that is on the full side, wring it out after its rinsed. Once they are all cleaned and rinsed, just lay them flat to dry. This normally will take 10-12 hours. I like to do this in the afternoon so that they will be ready to go the next morning. If you need to speed this process up, you can use your hair dryer on the COOL setting.  I'd suggest waiting until the brushes are at least 2/3 dry before doing this though.
There is no doubt that "Beauty Blender" style sponges have become a staple for so many of us. Personally, I use mine to apply foundation, concealer and powder. Some folks use them for blush, contour and highlight as well. Hopefully, you rinse yours out very well after each use.  Even under the best conditions, they will become covered in product.
                                                                                                                             
The good news is, cleaning these babies could not be easier! Fill a large mug or container with clean, soapy (Blue Dawn!) water. Drop your sponge(s) in and be sure they are fully submerged.
Now, just put the mug with your sponges in the microwave for 1 minute.  Once this is done, pour the mug out into your sink and run the sponges under cold water. DO NOT TOUCH THEM until after you have done this. You'll get burned badly if you do.
Once you have rinsed them, they will look good as new!


Ta-Da!!!!

Well, I hope this helps! I hope that after seeing this, you'll see that giving your brushes a good cleaning is not daunting and is absolutely worth it .
Have a FANTASTIC weekend , lovelies!


XO
~SheShe


Tan Application

June 18, 2018 in
Happy Monday!
So, I took the step to purchase the domain www.shesheandshimmer.com today. #gulp #notablogger...
I did this because so many of you kind, wonderful people have encouraged me and told me that you actually enjoy reading my thoughts on this stuff. So, thank you!

Now, let's get to how to apply your sunless tanner!
  This picture was from a week or two ago. This is a one day fresh sunless tan. In this photo, I had used the St. Tropez Extra Dark. PS: Please excuse the dated 1980's bathroom. The building that I work in is over 150 years old. That makes renovations a tad bit challenging.


  • Most importantly USE A MITT . Aside from keeping your palms from turning orange, the mitt helps blend the tanner... more so than latex gloves, bare hands etc, This one right here is the best mitt that I've found. I cannot stress how much I love this mitt! Skinerals selftanning microfiber mitt
  • Less is NOT more. Its easy to assume that if you use less tanner, you'll prevent a too dark application. Nope. The color of the formula is what determines the color of your tan. Using too little product will result in nothing but streaks and splotches #notcute. Think of what would happen if you were to paint a wall with too little paint....
  • Apply bottom to top. Start with your legs and feet and work upward. This will prevent creasing and rubbing.
  • Protect your knees, elbows and ankles. These are the spots where tanner can turn VERY dark and look unnatural. Before I apply the sunless tanner, I cover these spots with Burt's Bees Hand Salve Burt's Bees
  • Apply tanner to clean, freshly shaved,smooth skin. I've seen it countless times, some guru will stress to NOT apply moisturizer before self tanning.I cannot articulate how strongly I disagree with this. Smooth, moisturized skin will get you an even tan. Dry skin will get you uneven patches. Just be sure your moisturizer has been absorbed thoroughly into your skin before applying the tanner. I'll moisturize then throw laundry in the dryer, blowout my hair, etc THEN tan. 
  • When tanning your hands, make a claw with your fingers. This will keep your from having white knuckles.
  • To tan your back,put your tanning mitt on a loofah brush. You'll be able to reach your entire back this way. 
  • When tanning your face, mix equal parts tanner and your favorite facial moisturizer. This will keep the Oomph Loompa look at bay.
  • Don't be afraid to use 2 different shades in one application. I do this each time I tan. I'll use a medium shade for my back, face and feet and use a dark shade everywhere else. This gives you a far more natural look as most people suntan while laying on their backs.
  • Stay COMPLETELY dry after your apply your tanner. No teeth brushing,dish washing....NOTHING. Put your tanner on then, go straight to bed (ideally)
  • Don't be afraid of the color that first goes on. Most tanners have a color guide so that you can see what you are doing. This will rinse off in the morning (or after 8 hours)
  • BLEND, BLEND, BLEND this is crucial. In order to to make this faux glow pass for the real deal, it HAS to be blended thoroughly. Once you are SURE its completely blended......blend it for an additional 2 minutes.
  • Set aside enough time to do this correctly. If you are short on time.... don't sunless tan! While pale will always be pretty, streaks will never be!

I hope this helps! If you have ANY questions at all, I'm here for you!


XO
~SheShe


June is now in full swing! It’s the time of year most of us want a tan.
Funny thing about me, I've never had a "real" tan. My skin just is not capable of tanning. My dermatologist refers to it as "Type 1 skin".  Simply put, my skin does not produce enough melanin to tan.
When I was a teen and in my early 20's this upset me to no end #youngpeopleproblems. All I wanted was to be golden, but if I did go in the sun, I'd burn, blister, peel ...in that order.
Now that I'm in my 30's, I'm actually glad that I cannot tan. I know that younger me would of been completely irresponsible in regards to tanning. By now, I'd have skin that looked like an old shoe, or worse ....skin cancer.

However, I do still LOVE the look of a nice, golden tan. Because of this, I've tried and tested pretty much every sunless tanner out there. The four that I've listed below are the ones that have truly impressed me. These are the ones that stand out among all of the sunless tanners that I've used over the past 20+ years. In part 2 of this post (coming next week) I'll follow up with what I find to be my "best application" techniques. What good is even the best sunless tanner, if you are not comfortable applying it?


1) St. Tropez Extra Dark
St. Tropez Extra Dark
I'll be the 1st to admit, I find most of St. Tropez's products to be extremely overrated. Don't get me wrong, they are perfectly fine sunless tanners.  I just don't find them to be the epic, holy grail like some folks do. EXCEPT for this one. This one, I'm starting to wonder how I ever lived without. I put this on at bed time. I wake up to a tan that is so dark and deep. This gets my skin to a color that I never, ever thought was possible to accomplish with a sunless tan. You truly do look like you just came back from 10 days on the island of Saint Tropez.

2)Vita Liberta pHenomenal 2-3 Week Tan
Vita Libereta 2-3 Week Tan
This one is pricy... $54.00 as of when I'm writing this. There are two things that make this tanner really stand out. The first is how quickly it dries upon application. Your first leg will be completly dry by the time your are applying the tanner to your second leg. The other thing that's quite impressive about this, is how long it lasts and how it fades. One application went a full 10 days for me. Sunless tanner will typically become splotchy when its fading off.  This one though, fades the way a natural tan does. It just gets lighter, no splotching at all.

3) Quick Tan by Body Drench
Quick Tan by Body Drench
This gives you an immediate tan upon application that darkens over the course of several hours. This tanner preforms just as well as a professional spray tan.
This is perfect for if you need color ASAP. Its a spray formula , but still I find it applies best if you use a tanning mitt to rub it in. This will assure a perfectly blended tan.

4) Tanwise Tanning Mousse
Tanwise Tanning Mousse
Unless you are going for the extra dark St.Tropez , this is the best tanning mousse that I've found. This blends so easily, the color is dark, yet believable, It has no traces of orange and it lasts. Also, the price cannot be beat. Usually, I can grab it for $10-$15 dollars. It costs less than most of the other tanners out there. Yet, it out preforms them at every pass.


As I had mentioned above, I've been sunless tanning for over 20 years now. These are my "Product Heroes" that I keep in my arsenal at all times.

Be sure to come back next week. I'll be sharing all of the different tips and tricks I've figured out over the years to help attain the most flawless application possible.

Have a lovely weekend, love bugs!


~XO SheShe


The other day, after a conversation with a dear friend about beginning a decent makeup collection, I got to thinking....
If I had to start my cosmetics collection today, from scratch.....what would I buy?  I spent a few days thinking about this and jotting things down. I decided to share it here. Why? If you are someone who is just starting to get into makeup, this will serve as a guide as to what you might want to buy. Also, many of these things are tried and true "product heroes" that will serve anyone well regardless of what they currently own for cosmetics.
I broke this down by category. The name is listed on top, the link is listed below in hot pink.  As I've said countless times before...I'm not a writer. I have 0 aspirations to "Be a blogger" or generate income from blogging. I tell you this so that you'll know that you can confidently shop from these links if you so choose. They are directly connected to the products. I receive no "commissions" or anything like that. This is just me sharing with you what I personally purchase :)

Also, I've tried to include at least one "affordable" product in each category. Full disclosure, I pretty much tend to only buy cosmetics which would be classified as "prestige". That does not mean that you have to though. The things I've listed in the affordable categories , all hold their own against the higher end stuff. The only category which I have not included an "affordable" option is with the eye shadow palettes. This is for two reasons. The first of which is I just don't have enough familiarity with any drug store palettes to to encourage anyone else to go spend their hard earned money on them. The second reason is that most of these palettes that I mention, have 10+ shadows in them. If you break it down, each shade is literally costing you just a few dollars.

Lets get right into it!

Primers:
*Too Faced Hangover RX
Too Faced Hangover RX Primer

* Kat Vov D Lock It Primer
Kat Von D "Lock it" Primer

*NYX Angel Veil
NYX Angel Veil


Foundation:
* Dior Foreverskin
Dior Skin Forever

*Cover Fx Power Play (my new HG foundation!!)
Cover FX Power Play

*Wet & Wild Photofoucs (Its under $6.00!)
Wet & Wild Photofoucs


Under Eye Concealer :
* Becca Under Eye Brightening Corrector
Becca Under Eye Brightening Corrector

* Kat Von D Lock It Cream Concealer
KatVonD Lock It Cream Concealer

*NYX Dark Circle corrector
NYX Dark circle Corrector

Eye Shadow Palettes:
* Urban Decay Naked Palette AKA Naked I (Buy this one if you are warm toned)
Urban Decay Naked I

* Urban Decay Naked II (Buy this one if you are cool toned)
Urban Decay Naked II

* Kat Von D Shade and Light Eye Contour
Kat Von D Shade & Light


Blush:
* Nars Orgasm
Nars Orgasm

*Milani Baked Blush
Milani Baked Blush


Mascara:
* Tarte's Lights! Camera! Lashes!
Lights! Camera! Lashes!

*L'Oreal Lash Paradise   (No matter what, get the WATERPROOF version of this)
Lash Paradise


Brows:
*Anastasia Beverly Hills Perfect Brow Pencil
ABH Perfect Brow Pencil

*Rimmel Brow This Way
Rimmel Brow This Way


And there you have it....This is what I'd focus on getting if I had to replace all of my makeup .
Of course, there are so many other categories of stuff I love and use daily, such as setting spray, powders, false lashes, etc.
What I have here would get me through if say, the airline lost my luggage containing my makeup.
Also, if you are just getting started out with makeup, there is no reason to over complicate things.

As always , if anyone has any questions , just give me  a shout, I love this stuff!


XO
SheShe
© At The Kaiser's Table · THEME BY WATDESIGNEXPRESS